


Showing posts with label video. Show all posts
Showing posts with label video. Show all posts

Spiderman Homecoming Cookies
Who else is excited for the latest Super Hero movie, Spiderman Homecoming? Although I doubt my children will watch it with us, they are too little, I wanted to share the Super Hero excitement with them. My son just had a Batman party and loves to pretend he's fighting bad guys. They were climbing the walls with excitement as they watched me make these!
These Spiderman cookies are really pretty quick! I used a royal icing transfer for the eyes and that makes this whole cookie a low stress design. These are small enough to be used as an adorable cupcake topper or you can make them large round cookies for a party favor.
What do you need?
- round cookies - you can use a cookie or biscuit cutter
- royal icing in flood level - red, black and white
- Spiderman face template (Google Spiderman face images and pick your favorite. Be sure the eyes will fit on the cookie!)
- parchment paper

The first step in creating these fun Spiderman treats is to create a royal icing transfer of the eyes. Search and print an image of Spiderman's face that you like. Make sure the eyes will fit on the cookie. Copy and paste several Spiderman heads on a piece of paper and print out. Place a sheet of parchment paper on top. You should be able to see through to the template quite easily.
Trace the outline of the eyes in black and white. Your icing should be thin enough to flow, but not too loose. I think my icing was about a 15 second flood. Once you've iced all the eyes you need, do a few more! Sometimes these can be fragile and you'd rather have too many! Set aside to dry for 8-12 hours. They will pop right off!

Now outline and flood your cookies in a bold red. I used Americolor's Super Red and love it!

While the red icing base is still quite wet, gently place the eyes into position. Since the icing is wet and you don't have the web piped, you can move the eyes as needed until it's perfect for you.

Now you can either pipe the web while the cookie is wet or wait until it has crusted over. I piped mine while the Spiderman face was wet and didn't have any bleeding issues. First pipe the lines of the web, centered between his eyes.

Come back and finish the web with cascading lines in a circular motion. Hi, Spiderman! You are all done. Wasn't that easy as pie? Your little Green Goblins will devour these in no time and will be off to fight crime ridden playgrounds.

Do you need a royal icing recipe? Jump on over here to see the one I use every single week!
Maybe your kids favor Batman? I have some cookies and cupcake toppers for the dark knight as well.
Come watch the fun movie - just click the photo above to see me create the cookies.

Jenny

Dreamy Pastel Unicorn Cookies
Do you dream of pastel unicorn cookies? Me too! These sweet unicorns were a recent request and I just fell in love. These are pretty easy to do and you'll find that they are wildly adored. Wouldn't these be a perfect dessert for a baby shower or girly birthday party? Maybe as a cupcake topper on a bed of fluffy white buttercream.

Materials
Although pastel icing isn't my go-to palette, I find that I'm working with it more and more. There's something about the soft sweetness that calls to me when I'm working with babies, weddings and magical sweets. To create this soft palette, I use the tiniest amount of Americolor gel in royal icing. This palette used: electric pink, electric orange, lemon yellow, leaf green, sky blue and violet.
My unicorn cutter was from one of my favorite Etsy sellers, Bobbi's Cookie Cutters. The shape is perfect - the horn and nose are not too long and fragile. These could easily be shipped in the mail with little fear of breakage.

And all that sparkly goodness on the pastel mane? Totally edible and delicious! You can pick yours up at Bakery Bling. I was over the MOON when I found this glitter - so much on the market is just non-toxic, which does not equate edible. This one is completely edible and has incredible sheen!
The unicorn is completed with some shiny gold touches. I used my favorite edible gold paint on the horn, snout and closed eyelid. It adds such a shiny sparkle to the cookies - a perfect touch to these magical cookies.
I just adore these magical unicorn cookies so much, I think it's my 80's inner child that misses unicorns. These are fun to make, you'll love having fun with the sweet mane. I hope you make these - let me know if you do! Want to watch my quick video? Click the movie above to see how I created mine.

Jenny

Shark Week Cookies
Squee - Shark Week is just around the corner! Are you ready? This is my first year of embracing the cult phenomenon, but I'm excited. Being the librarian that I was, I'm going to use Shark Week as a time to teach my kids about why sharks are cool and shouldn't be vilified, but I'm also going to teach you a totally creepy shark cookie!
No special cutter is required - I simply grabbed my largest oval and hacked off a bit off the top. You want to give him a pointed nose, but don't stress over the exactness. I was also thinking this shark cookie would be perfect on a cupcake! Can't you just picture his sweet face on a mountain of cool blue buttercream? Yum!

Materials Needed:
- oval cutter - just slice the tops into a pointy shape
- royal icing flood consistency - black, red, maroon,white and grey
- royal icing piping consistency - white

The first step is to flood the edge of the shark in grey. I created mine to look as if you can only see most of one side, but you can make him symmetrical if you prefer. I just wanted to make that side-eye creepy look!
My grey icing was created by using just a touch of Americolor black gel. Go slow when you are adding your colors - much easier to go too dark too quick. There is a great post on Lilaloa on how to create awesome pastel colors.

While the grey icing is still wet, carefully fill in the rest of the shark with flood white and leave an opening for his mouth. His mouth almost looks like a pair of boxer shorts, lol! Just keep it blank for now, we're coming right back to it.

Using a small cut in a tipless bag or using about a 2 tip, outline the mouth in bright red while the white icing is still wet. Take this slow and easy, as not to get too far into the white.

Now fill in the remainder of the mouth with a flood level consistency of maroon. Ideally, you want all of this background to melt into each other in the wet-on-wet style. If that's stressful or you have problems with colors bleeding, feel free to dry in a dehydrator between each color layer.

Now come back with a finely cut black icing bag and outline the grey areas of the shark, add an eye, outline the mouth and a few noncontinuous lines on his head. You will be surprised at how much this can help pop the colors and it can cover some minors mistakes if they were made.

And the final touch? Some sharp, irregular shark teeth! I used a piping thick white icing and added two lines of triangles. You can use a toothpick or icing scribe to elongate some of the teeth to sharp, long points.

Are you so excited for Shark Week? Do you have any favorite treats or traditions? This is our first year embracing it and I can't wait! These cookies are so fun and I hope you try them.
XO,
Jenny

Raw Cookie Dough Recipe
I'm so excited summer is here - I love spending the days with all my babies in the pool, library and dollar theater. I don't love turning on the oven! In our new home, we don't have air conditioning (yet) and I try to keep the oven use to a minimum. But I'm a baker and we love cookies.
What to do? I wanted to try my hand at edible raw cookie dough. I love cookie dough! Cookie dough ice cream, frosting, brownies - you name it. Something about the creamy sweetness with chunks of chocolate. There are so many fun things you can create with it.. or you can eat it out of the bowl with a spoon.

It's super easy to make with only a few ingredients. But is it safe? While this recipe is egg-free, believe it or not, but what you have to worry about is the raw flour. There can be bacteria in the flour that we don't typically encounter because we bake what it's in. So how can we use raw flour safely? It needs to reach a temperature of 160 to be used in raw foods. I microwaved mine for 75 seconds in 15 second intervals and it worked great!
Yum
Raw Chocolate Chip Cookie Dough
By Jenny Rodriguez
This delicious raw cookie dough is easy and perfect! A wonderful addition in ice cream, frosting and more.
Prep time:
Total time:
Yield: 1 dozen raw cookie balls
Ingredients:
1/3 cup flour*
6 tbsp light brown sugar
1/2 tbsp vanilla extract
1 tbsp heavy whipping cream
4 tbsp butter, softened
1/4 cup mini chocolate chips
Instructions:
Want to see how quick this delicious cookie dough batter comes together? Click on the YouTube video above and learn how to make this treat in 5 minutes or less! I can't wait to make more variations on this recipe. Maybe a pumpkin spice dough that can be used in chocolate covered bonbons for autumn?

These are quickest, tastiest desserts ever! I have some big plans for how to use them in a summer treat, so I hope you come back soon. If you try these raw cookie dough balls, please let me know how you like them and what you used them in.

XO,
Jenny
Pst! Are you looking for a roll-out cookie dough recipe? Come try my Cotton Candy Cookies!


Batman Cookie Tutorial
My sweet baby is turning four this weekend. What?! Where on Earth did the time go? He's moved on from Dinosaur Train to Batman. Na, na, na, na Batman! He loves the Lego Batman and he loves flying around the house in his Batman cape. I've been busy making Batman decorated cookies and fondant covered cupcakes. This Batman profile decorated cookie is so easy and guaranteed to make your wee super hero squeal with delight!
What do you need to make them?
- Batman cookie cutters
- flood icing: black, white and peachy flesh
- icing bags, cookie scribes or toothpicks

1. The first thing you need to do is pipe a small white triangle for the mask eye.

2. Flood the bottom of Batman's face with a peachy flesh; I used a mix of Americolor Ivory and Peach to create his skin.

3. Flood the remainder of the cookie in black, take some time to smooth it out with a cookie scribe or toothpick.

4. Pipe a small line of black between Batman's lips. Use your cookie scribe or toothpick to draw it out more and down to create his moody frown.
Do you need a royal icing recipe? Click on over here to get my favorite that I use almost every day of the week,

I only work in black.. and sometimes very, very dark grey.
Happy Birthday my sweet little boy! I don't know where the time went, but you make our lives full of laughter, love and cars under my toes.
XO,
Jenny


National Wine Day
Did you know today is National Wine Day? A perfect excuse to break open your favorite bottle and enjoy a glass tonight. Or you know, if you are like me, today may not be too different. I love a glass of Pinot at dinner with some cheese and crackers. I thought it would be fun to recreate one of my favorite treats as cookies. Wouldn't these be perfect for an engagement party or a girl's night out?

In this video tutorial I will show you how to easily create a salted cracker, chunks of cheddar and Swiss, a slice of brie and wine glass. All of these decorated cookies were frosted with flood level consistency royal icing and using my favorite tipless bags. The only cookie cutters you need are: small round, small rectangle and a wine glass. If you didn't have a wine glass, you could also use a basic shape and ice in the design.

To help celebrate National Wine Day, I have a quick giveaway below for two of my new favorite drink books, The Periodic Table of Wine and The Periodic Table of Cocktails. These books are awesome for learning more about drinks and how to create the most delicious libations. I think you will love having them in your cookbook collection.
If you have any questions about how to frost the wine, cheese, and cracker cookies - please let me know!
Materials List
- Salted cracker - round cutter, dark brown flood icing, light brown flood icing and large sugar grains.
- Cheddar chunks - small rectangle cutter, light orange flood icing and red petal dust accent (optional)
- Swiss chunks - small rectangle cutter and ivory flood icing
- Brie slice - pie cutter with crust trimmed off, ivory flood icing and light brown icing
- Wine glass - wine glass cutter, ivory flood icing, grey flood icing and maroon flood icing

a Rafflecopter giveaway

Cheers my friends!
XO,
Jenny
This book giveaway is sponsored by ABRAMS Books, as part of the ABRAMS Dinner Party.

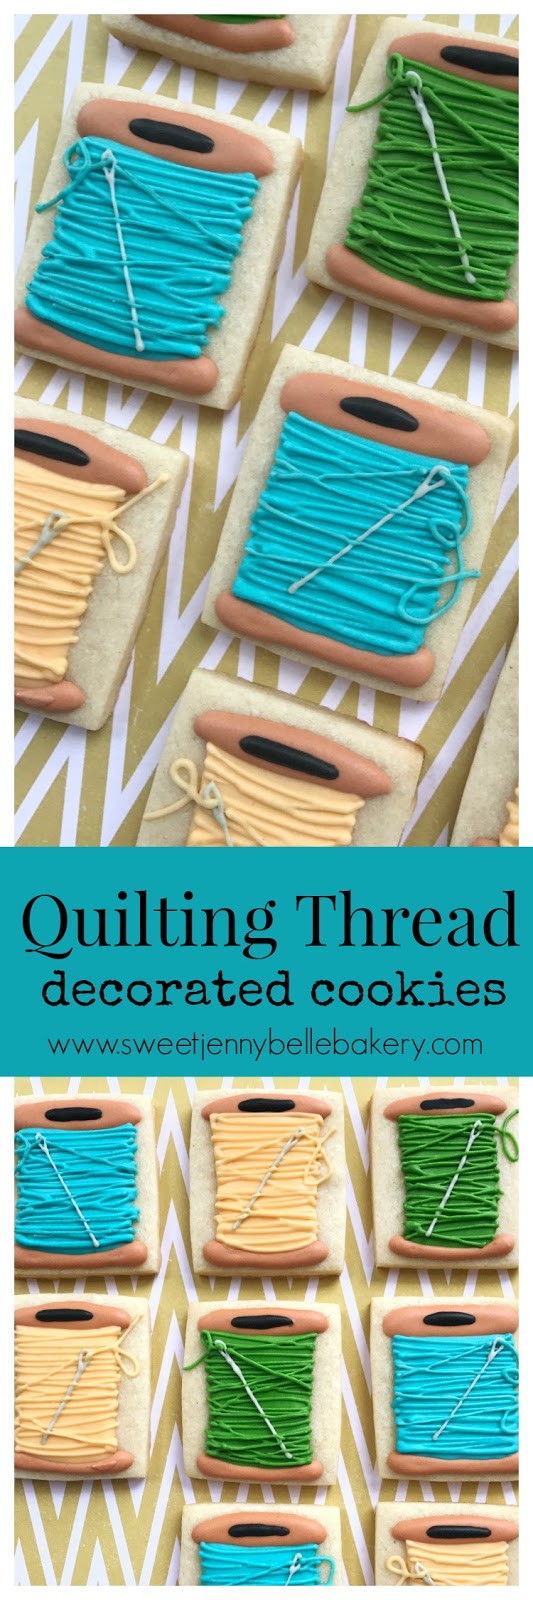
Quilting Thread Decorated Cookies
Before I fell head over heels in love with cookie decorating, I spent the majority of my free time quilting and hand sewing. My studio was full of a rainbow assortment of fabric and matching thread. I still love quilting, but share the time with decorating cookies.
This past week a new friend encouraged me to join the Portland Modern Quilt Guild. I was a member of the SLC chapter and it sounded like a great way to get back into my fabric stash. What a fabulous group of quilters and I can't wait to free my sewing machine from the moving box. This past week was also Quilt Market - a time when designers reveal their new fabrics for the season. It seemed like the perfect time to create sewing inspired decorated cookies.
These cookies are pretty easy and I have a video at the end showing you my process. As always, if you have questions, drop me a line or comment!
What do you need?
- mini square or rectangle cookies
- flood icing in: warm brown, black, grey and thread color
- PME tip 00 (for thread strands)

First ice the top and bottom of the thread spools in warm brown. The top part is a long skinny oval and the bottom is almost like a smile. Be sure to use a toothpick or scribe to spread the icing around, this also helps prevent catering.

While the brown icing is still wet, add a small black oval on the top of the spool. This is to give the illusion of the thread spool hole. You can also paint it with black food coloring or use a dark brown gel color.

I chose to add my base thread color while the spool top and bottom were wet. You could wait till they dry or place them in the dehydrator to crust a bit. However, I didn't find it problematic to work with wet by wet.
My thread spool is centered and doesn't reach the wood ends. If your lines are not perfect, don't fret. A lot of the base will be covered with "threads" in the next step.

To create the look of individual threads, I used the same flood icing but with a PME tip 00. This tip is super tiny, but with a flood icing it should come out with no issue. You could use a thicker piping icing if desired. Ice strings of "thread" back and forth on the spool; the frosting lines can be parallel and crisscross.

Now it's time to add the needle, with your grey icing frost a line cross the spool with an eye opening at the top end. Complete the look by icing just a few threads across the needle and one threaded through the eye. Aren't these so fun? They would be great paired with some button cookies too!
I hope you enjoy my little video of how I create these quilting thread decorated cookies. These are pretty easy and are sure to delight the sewing lover in your life. I think these cookies would be super fun as a cupcake topper too!
XO,
Jenny

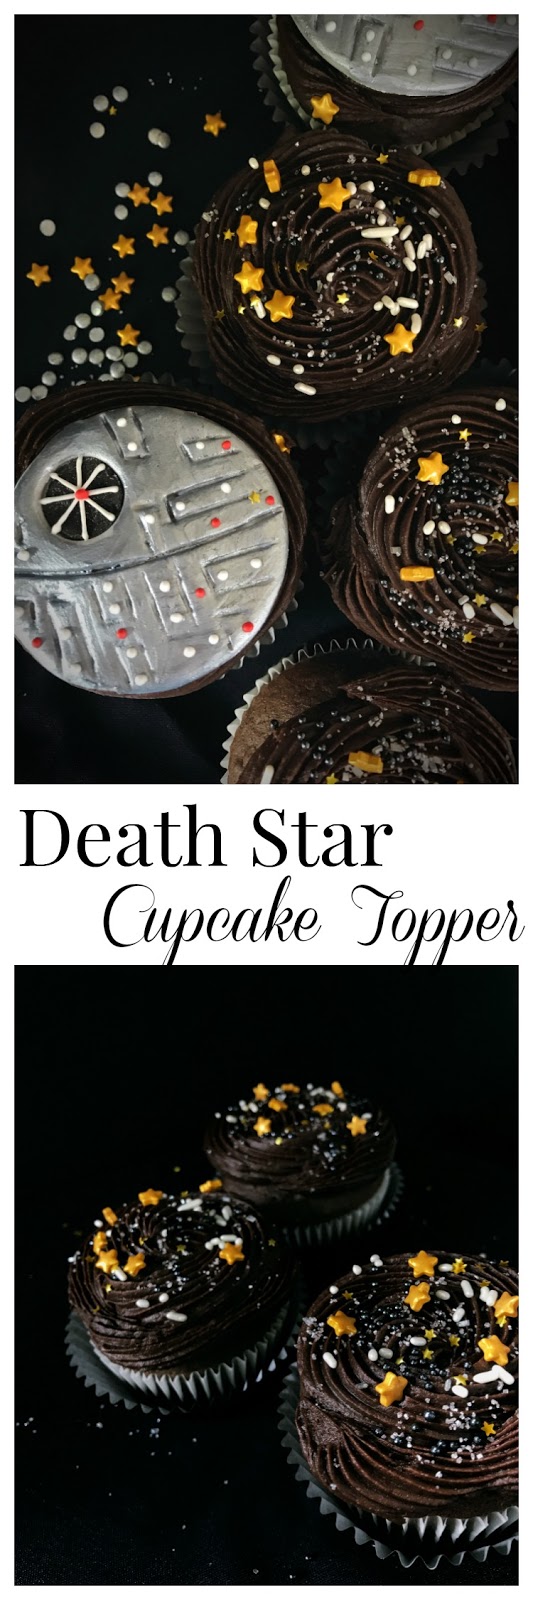
Death Star Cupcakes - A Fondant Tutorial
As soon as I see that little silver ball, I can immediately recall Darth Vadar's theme music. That's no moon, that's the Death Star. I've been contemplating what my special dessert would be on May The 4th Be With You. Decorated cookies have been the treats for the last three consecutive years, I wanted to do something a bit different. I was inspired by my best friend, Karen's Death Star Cupcakes, but of course want to put my own spin on it. I have a little experience with fondant and need to improve my skills. Cupcakes seemed a lot less intimidating than a whole cake! If you are new to fondant as well, I think you will find that this an ideal project.

Materials Needed
- grey fondant
- black fondant
- 2 1/2" circle cutter
- small icing tip (it doesn't matter which size, you will be using the base to cut)
- fondant tools
- edible silver food paint
- white royal icing
- red royal icing

When you begin, you will need to condition your fondant. While wearing gloves (fondant will pick up every bit of dust or color on your hands!) roll the fondant until it is soft and pliable. If you find your fondant is too soft, knead in a small bit of powder sugar. You can also add tylose to stiffen it, but be aware that it will become permanently more brittle and not the tastiest.
Roll out your black fondant to 1/8" thick. I use fondant roller rings on my small pin to make sure that it is consistent. If your fondant, mat or pin get sticky, sprinkle more powder sugar. Take a small icing tip - any size is ok, and cut out small circles using the base of the tip. Set these pieces aside on a pan to stiffen.

Now roll out your grey fondant to 1/4" thick - these are thicker because they are the base piece and will be resting on the cupcake. Cut out large circles with the 2 1/2" cookie cutter, these will be the Death Star.

I start the design of my Death Star by first creating the focal center line. It is a curved line since it is supposed to resemble a sphere. You can create the line lightly with a fondant tool until it's perfect. Then go back and make the line very obvious, but do not cut the fondant into two pieces. Next with the same icing tip, cut out a small circle on the left side of the top part of the Death Star.

Carefully lay your black circle into new hole on the Death Star. Use your large ball tip fondant tool to smooth it in. (See video below for visual explanation)
Create lines of the death star with one of your preferred fondant tools. They are open rectangles of various shapes and orientation. You want the lines to be prominent, but not cut into the fondant all the way. You could also use a toothpick to create these lines.

Now that Death Star needs to become shiny - so shiny! You can leave it grey if you like, but I wanted some metallic shine on those babies. There are a number of silver edible paints on the market, Wilton also has an edible silver spray located on the baking aisle of most craft stores. If you do use the spray paint, spray first and then add the black dot or it will all be silver.

Isn't it fun?! You could leave it just like this. It would be a perfect edible decoration for your dark chocolate cupcakes. However, if you enjoy working with royal icing or want to try a bit, I add a few more details in red and white. I have a large royal icing recipe here, but I have also used this small batch recipe and it would be perfect for this project.

Using the white icing in a no tip frosting bag or even a Ziploc, add a few lines on the black hole of the Death Star and a few white dots to resemble lights.

Add just a few more dots of red in the center of the black hole and surrounding areas.
Boom!
Your menacing Death Star is ready to be gobbled down by your Rebel Scum while you watch the movies at home. It isn't hard or intimidating - it may even peak your fondant interest as it did mine!
Want to see me create the topper in a video? There is fast paced one above - just click the picture. If you have any questions, be sure to email me!
You can create these toppers days in advance. Store them in a cool, dry and dark spot - placed on a cookie sheet in the cold oven is perfect. Sunlight will alter the colors of your fondant quicker than you will imagine. Place toppers on cupcakes right before serving. The yummy oddles of buttercream underneath will soften the fondant and if put on too soon, they will become limp.

XO,
Jenny
Subscribe to:
Posts (Atom)

