


Showing posts with label patriotic. Show all posts
Showing posts with label patriotic. Show all posts

Patriotic Cupcakes
This week I made a batch of patriotic cupcakes for one of our most favorite neighbors. Ron and his wife live across the street from us and are just the most amazing friends. My son runs over there daily to see what Ron is up to and sit on the porch with him. They spoil my kids rotten and are always looking out for us. When I heard that he was turning 75. I wanted to make something special for him and to honor him as a Vietnam Veteran.
I love making fondant cupcake toppers right now. It's such a low stress way to play with fondant and learn more about it. The toppers are easy to make and can be easily peeled off if it's not your favorite flavor; there is a generous mound of delicious buttercream underneath!

Aren't they so sweet? They are also crazy perfect for the 4th of July! You still have time to whip these up and enjoy while you watch the fireworks.
Materials
- fondant
- food gel color (Americolor sky blue and super red)
Tools
- small heart cookie cutter
- star fondant extruder

You will just need about a fist sized amount of fondant to create these American flag heart toppers. Split it up into 3 bowls and dye two of them blue and red. I always wear disposable gloves when I work with fondant, especially during the dye time. Fondant picks up any dust available to it and the dye will leave your hands colored for days!

Roll out your blue fondant to about 1/8" thick and with the star extruder, punch a ton of stars out. I used 3 stars on every heart topper. You may want to punch extra out just in case. Set them aside in a dark, cool spot to dry and stiffen up.

Roll out your red fondant to somewhere between 1/4-1/8" thick and create hearts with your cookie cutter. Just cut out as many as needed and you can soften the edges with your fingers tips if needed. If you have left over fondant, cover it with Crisco and keep in an airtight Ziploc for later use!

Carefully paint a small dab of water on the left side of the red hearts and press the blue stars down. The water acts as glue for fondant, but you really only need the smallest amount or you will have a mess! Aren't they so fun already?

Now it's time to add stripes to that ol' American flag! Roll out your white fondant to 1/8" thick and cut out hearts with the same cookie cutter. Using a very sharp knife, slice the hearts in half and then stripes. Each half heart will give you enough strips for 2 red hearts - you need to leave space for the "red stripes".

Just like the blue stars, paint a small bit of water on the right side of the heart where you will be placing the white stripes. Gently add the stripes and press them down.
Set these yummy cupcake toppers aside to stiffen up. You will want to place them on the cupcakes right before serving. The buttercream softens the fondant quite quick and you don't want a soggy topper!

Ron just loved his patriotic birthday cupcakes and I know that your guests will love these as much on the 4th of July! They are sweet, easy and beaming with American pride.

Happy 4th of July!
XO,
Jenny

4th of July Cookie Set
I love the 4th of July. It's one of my favorite holidays and has been since I was a child. I so vividly remember the excitement of fireworks outside in the front yard with my family. There was something rebellious and wonderful about getting to stay up late to light glittery sparklers.
When my parents first moved to Vancouver, WA they found the sweetest parade. All the children decorate their red wagons, scooters and bikes in red, white and blue. The children wave their little American flags and just beam with pride. It gives you hope.
This year my children can't wait to be a part of that fun parade and have already started planning on how to decorate their bikes. It's so sweet and makes me appreciate this country all the more.
When Shey of SheyB Cookie Designs asked if I would be interested in designing a July set of cookie cutters, I was thrilled! What an amazing opportunity and I already had the scene in my head. I couldn't wait to make and bring these ideas to life. You can buy them soon at her store over here.

When my children were young, I hated fireworks. Oh the noise! It seemed liked as soon as I would get them to sleep, BOOM BOOM. But now that they are older, we all love them again. I love to watch their faces full of excitement as the colors burst in air!
These firecracker cookies are a snap! What do you need?
- black and gold piping thick icing
- white, blue, and red 15 second flood icing
All of the icings were used in tipless bags and were created wet-on-wet. You'll see that I do the black outline twice - it's a little trade secret. The first round of outlining helps you ice with clear definition of where everything goes. However, the flood icing always spreads a little too much over on the outlines and you lose that coloring book appeal.
Be careful when icing the second time, this is what will stand out. Never dip your tip on to the cookie, just hover slightly above it.So gorgeous when you are done!

The decorated wagon cookies maybe my favorite. There something about the sweetness and love of a child. These are equally easy - just break it down into shapes.
What do you need? Same as the firecracker:
- black and gold piping thick icing
- white, blue, and red 15 second flood icing
Wouldn't these be adorable with the child's name personalized across the wagon? I just love it and I'm busy coming up with alternate themes we can do with this sweet cookie cutter.

And of course, our flag softly waving in the breeze. This is a great one if you are wanting to try more wet- on-wet. The flag stripes are not intended to be straight lines, so don't stress! It's a flag waving in the air, the lines should cascade down and slightly jagged. I've always loved impressionism art most, embrace that looseness with this one and you will be happy!
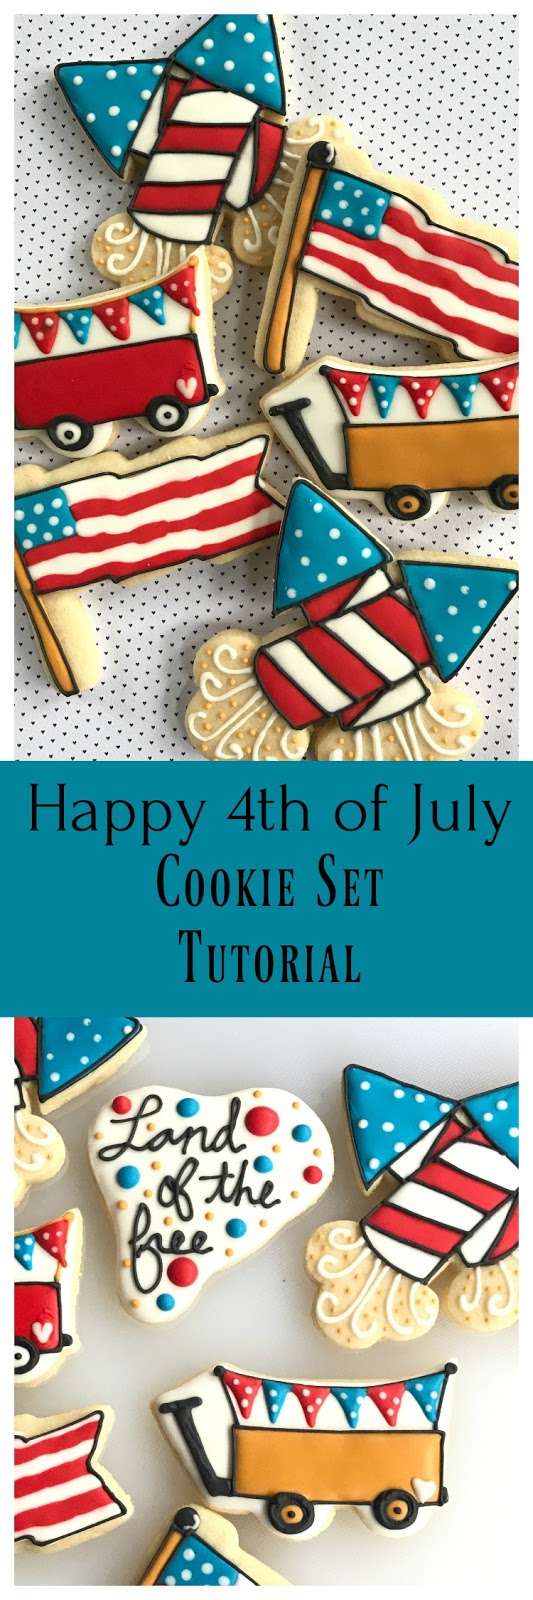
I hope you love my very first design of cookie cutters. It was an absolute dream come true and I can't wait to bring you more designs. So check in with Shey soon - she has such an amazing line of cutters. I want that giant unicorn cookie cake!!

XO,
Jenny

Patriotic Pinwheel Cookie Pops
Does your family go all out for the 4th of July? I have such fond memories of the holiday from my childhood. We would have a big BBQ at my grandparent's home in Southern California. There would always be an ice cream sundae buffet and then we would divvy up all the fireworks. Such sweet memories and I hope my children look back with affection on our traditions as well.
We may no longer be in California, but we are together and looking forward to another family BBQ this year. I wanted to create a super fun cookie that would be memorable for the children and look great on the table. These pinwheel cookie pops are the best! Not only are they delicious, but they are so beautiful and add fun height to your patriotic dinner spread.
Materials Needed:
- pinwheel cookie cutter
- your favorite roll out cookie dough recipe
- patriotic paper straws (hello, Target)
- cookie pop sticks
- stiff white royal icing
- flood royal icing in red, white and blue (I used Americolor Super Red and Royal Blue)

1. Roll out your favorite sugar cookie dough to 1/4-1/2" thickness, depending upon your preference. For cookie pops, I think you are better off with a thicker cookie - there is more room for the cookie stick and less of a chance that it will break. Cut out desired number of pinwheels and place on cookie sheet. Chill in the refrigerator for 30-60 minutes.

2. Gently press your cookie sticks up into the pinwheel about half way to the top. If your stick breaks through to the back or front, don't worry, just gently press the dough back on it. Bake cookies according to your recipe instructions - I typically bake mine for 11 minutes at 350 F.

3. Once cookies have baked and cooled, squirt a small amount of white icing around where the cookie meets the stick. Gently cover the stick with the cute paper straw. You can then squirt a bit more icing at the top and wipe away the excess. When the royal icing dries, it will harden and keep the straw in place.

4. Allow the icing to dry in the straw for about 30 minutes.

5. With your red flood icing, outline and flood the pinwheel triangles. You can help spread the icing around with a toothpick if necessary.

6. While the red icing is still wet, gently drop white polka dots into the triangles.

7. Fill in the remaining portions of the pinwheel with the blue flood icing. If your red areas have not developed a dry crust, be careful with the borders or you can pop it in a dehydrator for 10 minutes at 90 F.

8. With your stiff white icing, pipe an outline of the pinwheel and center button.


Voila, you have an adorable and patriotic pinwheel cookie pop. Your kids will go crazy about these, I promise! And they can perform double duty - set them in a pretty vase as a fun focal piece for your buffet before they are devoured as dessert.
Looking for a royal icing recipe? Search no further, click here for mine!
XO,
Jenny

Berry Cheesecake Push Pops
My kids will be out for summer in just a few weeks. I can't wait for the long lazy days - family camping trips, pool days and parties at night. One of our favorite summer traditions is a big party with our family on the 4th of July. I love to create new desserts for this special time and make them patriotic themed. This year I pulled out my push pop molds to play with for the dessert.
Up here in the Northwest, the berries are so crazy gorgeous, I knew that I wanted to make them the star. And how perfect are juicy blueberries and ripe, red strawberries for patriotic meals. To make them shine, I added a no bake cheesecake - who on Earth wants to heat up their ovens when temperatures are 90 F outside! This graham cracker crust and fluffy cheesecake come together in just minutes - I promise this will be your new favorite summer treat.

Yum
Berry Cheesecake Push Pops
By Jenny Rodriguez
These no bake berry cheesecake push pops are perfect for your next summer party. So fun and quick!
Prep time: ,
Cook time:
Total time:
Yield: 8 push pops
Ingredients:
3 full graham cracker sheets, crumbled
3 tbsp. brown sugar
2 tbsp. melted butter
1 cup cream cheese, softened
1/2 cup powder sugar
1/2 tsp vanilla extract
1 1/2 cup blueberries
1 1/2 cup chopped strawberries
(optional) edible gold stars
Instructions:

You are going to love using these push pop molds! I've bought them before at my local craft store and I have purchased them online here. I think these would be fun to change for the different holidays - maybe a pumpkin pie and spiced nuts for Thanksgiving?

Subscribe to:
Posts (Atom)

