


Showing posts with label sweet jenny belle. Show all posts
Showing posts with label sweet jenny belle. Show all posts

April Fool's Day Cookie
Do you celebrate April Fool's Day? I never did and then I had kids. Kids love pranks and gags and April Fool's Day! I finally gave in and now each year I search for new ways to make them laugh. Well we can be a low brow family and fart jokes always please. When I showed them my drawings for the whoopee cushion cookie, they just howled.The whoopee cushion cookies is pretty easy! Come check out the video below to see. If you have any questions, let me know!
Materials Needed
(I've also used this cutter as a turkey leg, but not a hot air ballon as of yet!)
Tipless icing bags

Looking for a royal icing recipe - come read my post here!
Do you have anything silly up your sleeve? Let me know!

Easy Candied Lemon Peel
Have you ever tried candied lemon peel? It is an incredibly refreshing and sweet candy that is easy to make in your kitchen! I'm in the process of creating a new spring roll out cookie recipe and candied lemon peel is one of the key ingredients. Lemon is a fabulous flavor to enjoy all year, but it always calls to me especially in the summer months. I think you will find a number of desserts and breakfast pastries that would be lovely paired with this candied lemon peel. It's so easy - let's get started!

- First pick the most gorgeous lemons you can at your local grocer. You will need 4-6 lemons depending upon the amount of peels you would like. Make sure the skin is free of blemishes and feels ripe.

- Next you will need to cut and juice the lemons. Be sure to reserve all the delicious juice for your next lemonade or meal. I kept mine for my lemonade buttercream that I will be sharing later this month.
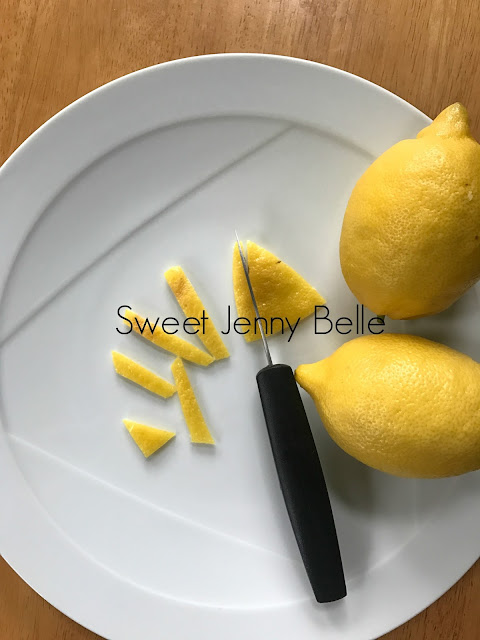
- After the lemons have been juiced, Carefully remove the flesh and thicker parts of the pith and dispose. Don't scrape the insides of the lemon too harshly - the acidity will be cooked out and you want to have a nice, meaty peel.

- Place all the lemon peel strips into a pot and fill with water until they are covered. Bring water to a rolling boil and cook for 5 minutes. Drain the water and repeat the process one more time. I only boil my lemon peels twice, but it is very important to drain and refill the water.
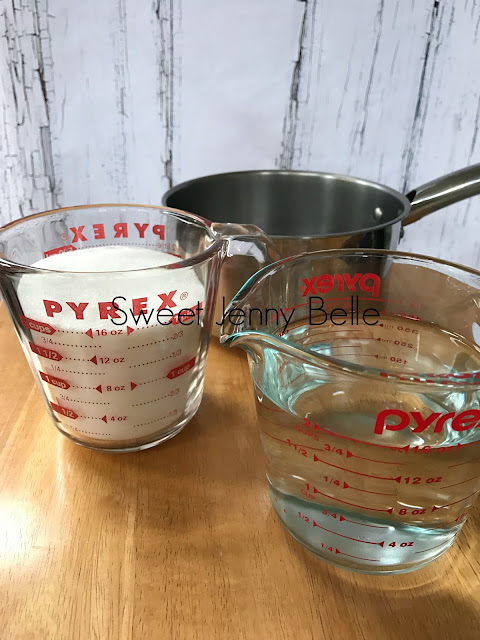
- While the lemon peels are draining, you will need to bring a simple sugar to a boil. Place 2 cups of white, granulated sugar into the pot with 2 cups of fresh water. Heat the simple sugar to a rolling boil.
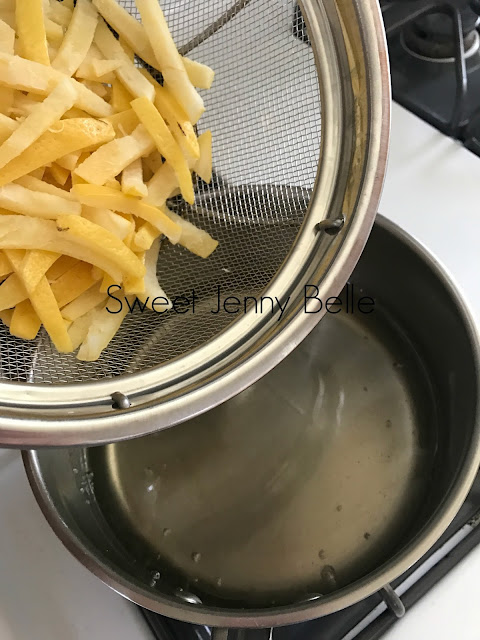
- Carefully place the drained lemon peels into the boiling simple sugar. Lower the heat and simmer for 90 minutes.

- After the peels have simmered for 90 minutes, carefully drain and reserve the lemon simple sugar. This is an amazing treat and shouldn't be tossed down the drain. You can use it to sweeten your homemade lemonade or for mixed drinks - maybe a lemon drop martini, yum!
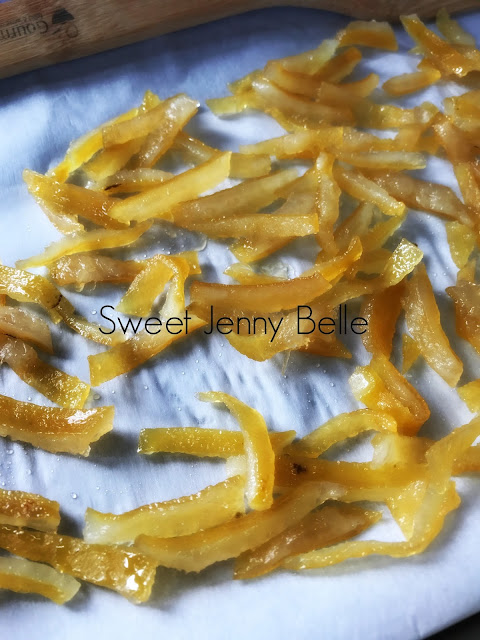
- Lay out the sticky lemon peels on a piece of parchment to dry for about an hour. You would ideally like to lay them in a single layer to drain the excess simple sugar.

- Gently coat those delicious candied lemon peels in a bowl of fresh white, granulated sugar. Make the surface of the peels are well coated or you will have a sticky mess. Lay the coated peels on a new piece of parchment and allow to dry overnight.


And my friends, that's all there is to it! Your tasty candied lemon peels should be stored in an airtight container. There are so delicious just as they are - I had to shoo my three children out of kitchen because they kept stealing them for a sweet snack. You can toss one into your lemon drop martini, dip them into white chocolate for a special treat or chop them and place on cakes!
Come back soon and I'll show you where these tasty morsels are headed.
XO,
Jenny

Moana Decorated Sugar Cookies
We had to move away from Utah this past winter. It's a long and not so happy story, but all is well now - in fact, it's better than ever. We moved to Vancouver, Washington along with my parents. During our crazy transition, the kids and I were so excited about Disney's Moana. I love the ocean and was thrilled to see a new character with a diverse and beautiful history. We loved it! The music was outstanding, the imagery was gorgeous and the theme of the story was perfect. My daughters loved Moana's courage and ability to begin a new chapter - a perfect movie.
During our move, I didn't have access to all of my fun cookie decorating tools and honestly was crazy busy unpacking and helping the kids get settled. I'm finally ready and so excited to be back. I have missed all of you and cookies! It seemed very appropriate that my first set back into the world of cookies should be the theme of Moana.

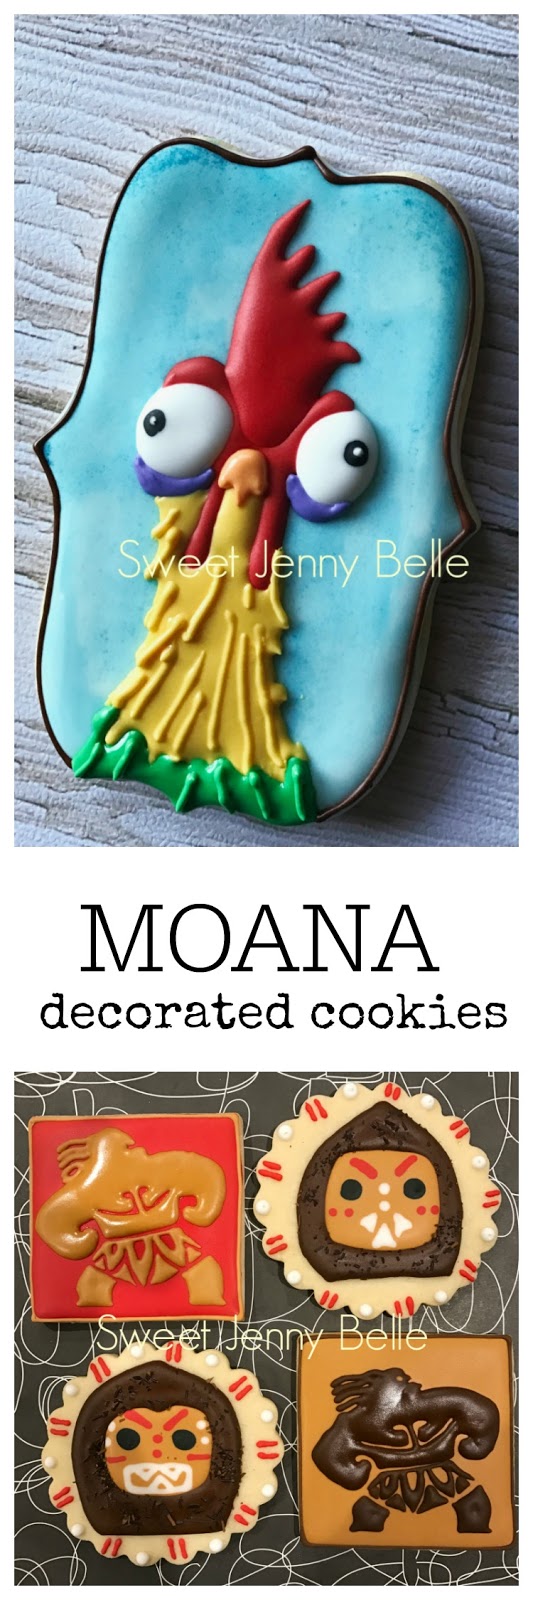
The first character I wanted to create was Hei Hei. That silly chicken makes us all laugh our heads off. I tease my kids that I look like him by the end of the day because they drive me bonkers. I did a rough sketch to get an idea of the shapes needed to draw him and added color for fun. The more times I draw a new cookie, the easier it is for me to ice him later.

And here is he is in all his goofy glory! Those icing eyes were a hoot to make. My kiddos fought over who could gobble him down.
Seriously. I look like him when 5 o'clock rolls around..

Next up, I created those angry, but cute Kakamoras and Maui's tattoos. The Kakamora's faces were created with a wet-on-wet style. The coconut shell was iced on after with some large sprinkles added to create that hairy husk appearance. Maui was actually one of the easier cookies, but he is a favorite on my Instagram account.

And this trio was my favorite of the bunch. Moana's necklace, Maui's constellation and Grandma's wise words. Sigh. This movie was just awesome.
Moana's necklace was painted with a metaliic edible silver food paint. The stone was a wet on wet design, blended together to give it a rock appearance.
Maui's constellation was flooded in a turquoise blue with edible glitter sprinkled while it was still wet. I then sprayed a dark blue along the edge with my airbrusher.

If you haven't see Moana yet, what are you waiting for? You will love it and I hope you loved looking at these cookies. Come back next week for a new cookie recipe that is perfect for Easter!
XO,
Jenny
Confection Connection - Circus Cookie Set
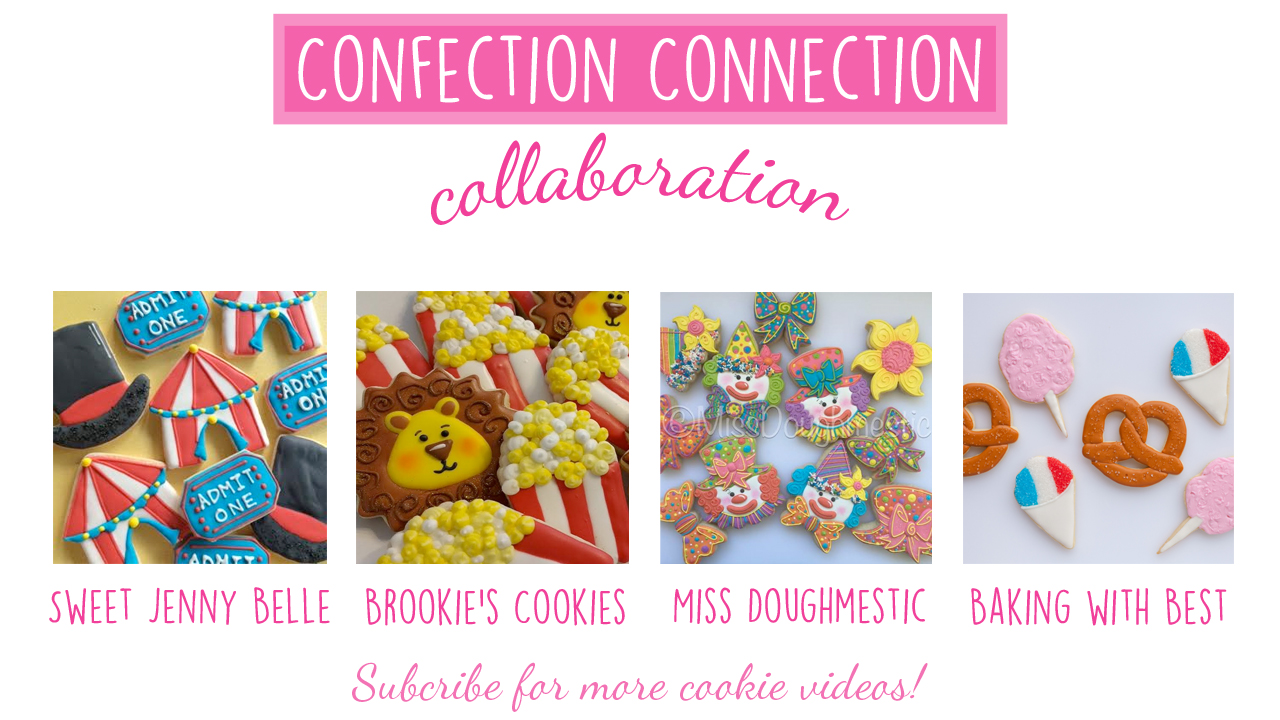
Have you had a chance to watch all the videos from this month's cookie set by the Confection Connection? These were so fun to create with my cookie artist friends. I'm already drumming up theme ideas for the end of July. Do you have a suggestion? Email me - I would love to hear from you!

Yesterday I presented you with my circus tent and ticket tutorial. Wouldn't these be perfect for a school carnival or circus themed birthday party? They are fun and easy! And I think that ring leader hat would be awesome for a magician too!

My friend Tiffany of Baking with Best, made such delicious carnival themed food that would be perfect for so many different cookie sets. That pretzel would be fun paired with beer for Father's Day and the snow cone is so patriotic, perfect for this weekend's Fourth of July parties.

Brooke of Brookie's Cookies created the sweetest lion that you could ever imagine trying to tame. I love the extra sparkles on his mane. And wouldn't these also be perfect for a "Wizard of Oz" themed party? I can just see him with a little Dorthy.

And last, but not least I think Zoe of Miss Doughmestic has ended my crazy fear of clowns. How sweet and colorful are these guys? I love all the rainbow colors and their happy expressions. Such a fun little cookie that would be a perfect for any birthday celebration.
If you haven't already, be sure to stop by YouTube to watch all these yummy cookies created before you!

Cookie and Mixbook Giveaway!
Have you enjoyed the scuba decorated cookies series this week? I hope I've inspired you and have been able to teach you a new trick or two. I'm so excited to give these to my dad for Father's Day! Every year I gift him a special set of cookies and a photo book. I take so many photos and love to share them on social media, but I rarely print them out. My Dad knows each year I will gift him a book that has all our family photos from the past year.

A few months ago my scuba loving dad traveled to Fiji for an amazing diving adventure - sunken ships and beautiful sea life. I know he had an amazing time and was so excited to share that with my children with his photos. I knew that creating a photobook of his adventure would be the perfect gift for this Father's Day!
I met Mixbooks at the SNAP convention back in April and have really wanted to collaborate with them. I saw their high level of quality that had been missing in books I've ordered from other companies. The printed color is true and gorgeous clarity!

And now you can win too! Mixbook and I are sponsoring a giveaway below for $50 credit for any of their amazing products and dozen of my cookies in the theme of your choice. You can create a photo book for dad, a calendar of your kids or get started on holiday cards! I know you will love working with them and be thrilled with the quality.
a Rafflecopter giveaway

Scuba Decorated Cookies - Part Two
Today I'm diving into the softer palette of the ocean in my scuba themed decorated cookies. When I think of the ocean and beach, I think of soft sand and searching for shells. The color palette is muted tans and palest blues. This color palette and imagery is so calming, isn't it? You can almost hear the waves crashing. And there is something so beautiful about a starfish.
This sweet guy could be perfect in bright hues for Little Mermaid or Finding Dory themed cookies too. Want to learn how to make these pale beauties?
Materials
- starfish cookie (I've had mine forever and not sure where it's from, but they are common)
- flood icing in: white and sandy (Americolor ivory and a touch of warm brown)
- Petal crafts color dust in Palette B - I think this is the cyprus color. The chart is crazy!
- food only paintbrush
Directions

- Flood the cookies in sandy icing and allow to dry 8-10 hours or sit in the dehydrator for 10 minutes at 90 degrees. Need a good royal icing recipe, click over here!

- When the cookies have completely set, you will darken the perimeter of the cookie with petal dust in the cypress shade. This is a dry brush technique - though if you want it to be darker, you can dip your brush into vodka or clear vanilla.

- Using the white flood, add a few medium sized dots in the center of the starfish. You can be sporadic like me or choose a fancy design.

- Fill in the rest of the starfish with smaller sized dots in the sandy flood icing.

And that's it - gorgeous soft beach themed cookies. Have any questions, let me know! Want to see those shells created? Jump on over to my Instagram page.
Come back tomorrow more the whole Scuba Dad cookie set!
XO,
Jenny

I Want S'more Campfires Cookies
I hope you have enjoyed this camping series of decorated cookies. I think they would be so fun to make for a summer birthday, for your troop of scouts or for a family camping trip. Cookies are a perfect dessert to take with you this summer since you don't need refrigeration and they pack well!
Do you want to make these campfire cookies? They are pretty easy and everyone loves them! My favorite part of camping has always been the dinners and desserts roasted over the open campfire. Here is a quick video of how I made mine.
Materials
- round cookie
- flood icing: black, red, orange and yellow
- soft piping: chocolate brown, tan, grey, and green
- americolor white (for splattering star effect)
- food-only paintbrush
- toothpick, cookie scribe, or turkey lacer.
Directions
- Flood your round cookie in black icing and allow to set. Then using a food-only paintbrush, splash a few drops of americlor white on to the background. This will give the appearance of a dark, starry night.
- Next using chocolate brown, ice two intersecting campfire logs. With your tan icing, frost two large ovals on the bottom ends of the logs and a few jagged lines on the logs to create the look of wood. Add a small swirl of chocolate brown in the tan ovals.
- Pipe a few rounds of grey around the campfire - avoid the top, that's where your fire will go. Add a few lines of green grass near the stones.
- Allow everything to dry - you can quicken the time by placing it in a dehydrator for 10 minutes at 90 degrees F.
- Add a large raindrop of red in the center of the two logs. Then add some orange and yellow in the middle. Using a sharp toothpick or tool of your choice, run it through the center of the fire and feather it up and out to create the illusion of flames.
- Allow the cookie to dry overnight or 8-12 hours.
Thank you so much for joining me! Did you see the other camping cookie tutorials? I have one on fireflies here, another on camping lanterns here and my favorite royal icing recipe can be found here. If you have any questions, please let me know!
Come back next week for series on all things bubbly and fishy..
XO,
Jenny

Camping Cookies - Firelies in a Jar
I'm going to confess - as many times as I've been camping, I've never seen a firelfy, let alone capture one in a sweet mason jar. However, I love the idea of them and the magic they must illicit in young children. And I do believe that all beautiful things are those that are wild & free.
I created these fireflies as a royal icing transfer on Facebook live. Have you joined me for a live tutorial? They are fun and messy and full of real life - so if you have any desire to see a behind the scenes, be sure to like my page and keep an eye out for my live demos.
Royal icing transfers are awesome! I sketch on the back of parchment and ice on the top. You could do accents, letters, and more. If you mess up, no big deal - it's not on the cookie yet! This is an excellent way to practice and try new things out. I do suggest making more than you need because they can be fragile. Once they are iced, let them dry for a couple hours. Store the leftovers in an air tight container - they last forever!
This ampersand is so easy and there are so many themes you could create with it. I purchased the cutter at Semi Sweet Mike. I iced the background in a neutral white, but you could leave it naked if you didn't want that much icing. What would you fill in?
Wild & Free
You & Me
Now & Forever
Have you seen the other camping cookies? Try out these fun camping lanterns or sweet glamping trailer!
Do you need a good royal icing recipe? Try out my favorite here!

Camping at Night - Decorated Cookies
For the cookies today, I'm focusing on all the fun that happens at night when you're camping. I love the idea of comfy sleeping bags in the grass and the sweet glow of the lantern at night. Though when we're actually camping, I'm not sure that I have fond feelings about my sleeping bag. lol! What is your favorite part of camping?
The key part to a successful sleeping bag cookie appearance is waiting. You need to wait to add adjoining segments of the bag until the last one has slightly crusted over, otherwise they will run together and it will just look like a long tube.
The soft green grass needs to be done with stiff royal icing. You can see with my yellow sleeping bag cookies that the icing was a bit too soft and didn't want to keep the shape. I used Wilton top 233 for the grass. If you need a good royal icing recipe, click here for my favorite recipe.
On Instagram, the lantern is receiving all the love. Maybe there is something in the nostalgia of a camping lantern?
What cookie cutter did I use? I just happened to buy a bubble jar cookie cutter from Bobbi's for a different set of summer cookies and when I opened it, all I saw was a lantern! I think it's perfect. You can either flood the base in a neutral color ( I did white) or you can leave it naked.
Again, the key to this cookie will be waiting to ice the different parts of the lantern until the adjoining parts have dried. I did use a wet-on-wet with the grey filament in the golden lamp.
I hope you are enjoying this camping series! I loved making it - come back tomorrow for more outdoor fun! And please let me know if you have questions.

A few months ago I was scrolling Facebook and saw an ad for the Everything Food Conference. It was going to be held in Salt Lake and was all about food. I mean, how perfect is that? I know I have much to improve upon on my blog and knew there would be amazing information at this conference. And food.
But here's the thing, I have immense trouble at conferences. Am I shy? Maybe. Introverted? Definitely. And I hate trying to sell myself. What to do? One of my most favorite bakers, I Am Baker (Amanda Rettke) was going to be a speaker and I just couldn't let this opportunity to slip by. And then my amazing friend, Ashlee Marie, was signed up as a speaker too. That was it. I registered as a volunteer and counted the days!

The food was amazing! They worked so hard to make sure that everyone there was completely stuffed full of delicious food from sun up to sun down. We had Waffle Luv for breakfast one day, Kneader's for lunch on another. There was an open (and free!) snack bar at all times. Seriously. I don't know how I am able to zip up my jeans this week. The food was amazing and I'm kind of bitter to be back home and having to cook dinner every night.

But the highlight for me was the opening keynote speaker, Pat Flynn. Are you familiar with his podcasts? I wasn't - I had no idea who he was (sorry Pat!). His speech was powerful and motivating. It focused on why are we doing what we do - to be with our families.
I've spent these last couple months trying to figure out the best direction for this business. Do I open a storefront? Do I lease a bigger kitchen? What? And Food Network called me and then they changed their minds. And it's been crazy because I didn't have an end goal. I opened my bakery and boom, success landed in my lap. And I'm so appreciative, but it's taken me aback.
After listening to Pat talk, I knew I had to move and now. Yes, I will continue to sell cookies. Thank you for choosing me to be a part of your special moments. I am planning on moving my business to focusing more on YOU. I want to bring you better tutorials - real ones that you can walk away from and recreate in your home. I want to bring you the latest materials and tools out there to help us bakers. Because you know what, if you want to make the cookies for your child's birthday - I want to be there to help you. So in some ways my business is not changing and in other ways, it's huge. Don't hold your breath for a store front. If I were to open one, how can I create tutorials for you? I couldn't. We can do anything, but not everything. So sit back and get excited, only more cookie fun is coming!


And my new foodie friends helped unlock the secrets of SnapChat for me. Are you on there? Add me! I'm Sweet Jenny Belle, of course. A peek into how I balance homeschooling my beautiful children and making delicious cookies.

Did you celebrate Cinco de Mayo? Or do you have a fiesta planned later this year? My husband's family is from Mexico and we love to celebrate. No, I know it's not Mexican Independence Day and I know that Mexico doesn't celebrate the day. But we do, it's our family tradition and we love to have fun with it!
I created this set with maracas, talavera, sombreros and marigold flowers. All of these cutters came from Cookie Cutter Kingdom.
It took me some time to find a way to create the marigolds the way I envisioned. You can see a quick video here.
They won't dry perfectly smooth since you've painted vodka and coloring on them when they were wet, but I actually like the dimension and feel like it gives it a little something more to the floral petal look.


The fun set of cookies that I made this year after my husband was very vocal about wanting treats for the day!

Are you celebrating May the Fourth be With You? We love Star Wars and can't wait for the next movie to come out. My Star Wars cookies are always a hit and so popular in my Etsy store. The Death Star cookies are a favorite of mine. Have you seen my blog post on how to make them?

Aren't these Princess Leia cakepops fun? The fun addition of the pink bubblegum (fondant) seems to give her such a careless attitude, it cracks me up.

And here's a snap of my whole Star Wars set. Are you doing anything fun? What's your favorite Star Wars related treat? Hope the force is strong with you today and popping in your favorite episode!

This past week I ordered a number of new cookie cutters from The Cookie Cutter Kingdom. I'm so excited and there are so many new sets in the works. I love them all, but I absolutely had to play with the icing bag and Kitchen Aid mixer cutters first. I spend just about every day mixing icing and it was fun to decorate these.

It dawned me that it would be amazing if Kitchen Aid created polka dot bowls - I mean really, how adorable would that be? Until they listen to my pleas, I can create them on cookies. What is your favorite polka dot color combination? I think I may have to ice some with other patterns on the bowl.
Materials you will need:
- Red flood icing
- White flood icing
- Grey flood icing.
I used tipless piping bags for all of the icings. The polka dots are created with the wet-on-wet technique. Want a visual of how I created them? Click on the video below for a fun video.
Subscribe to:
Posts (Atom)

