


Lemon Gingerbread Cookies
The other day I had the biggest craving for soft gingerbread cookies. It seems like ginger cookies are typically reserved for fall and Christmas, but why? I love the spice and deep flavor of ginger and wondered if there was a way I could create a recipe that felt lighter for summer. My favorite summer flavor is citrus - so bright and clean. It seemed like a perfect pairing - spicy ginger with bright lemon. I also knew that I wanted to add in my delicious candied lemon peel (you can find the quick recipe here).
OK, so let's make it!

Aren't they pretty and just scream summer?
Lemon Gingerbread Roll-Out Cookies
Materials
- 5 cups flour
- 1/2 cup white sugar
- 1/2 cup brown sugar
- 1 tsp. salt
- 1 tsp. cinnamon
- 1 tsp. ginger
- 1/4 tsp. cloves
- 1/4 tsp. nutmeg
- 1 pound softened butter
- 2 large eggs
- 3/4 cup molasses
- 1/2 cup chopped candied lemon peel

Directions
1. In a large mixing bowl, combine all dry ingredients (flour through nutmeg). Gently mix together and set aside. Be sure that the candied lemon pieces are coated with the flour mixture.

2. In a stand mixer, cream softened butter with the two large eggs and molasses until well combined. This mixture is going to be super sticky, don't worry - all that molasses will be soaked up with the dry mixture.

3. Carefully add the dry mixture to the creamy butter bowl. I add a few cups of the flour to the butter and turn on the mixer, blend until well combined. Repeat until all the flour has been added.
*Again, this is super sticky - it will be helpful if your hands are floured as well. Do not fear flour with this cookie recipe.

4. Plastic wrap the dough tightly and chill in the refrigerator for at least an hour and up to overnight. The colder the dough is, the easier it will be to roll and cut cookies.

5. When your dough is nice and cold, place on a floured surface and liberally add more flour to your hands and rolling pin. Roll out to 1/4" thick and cut desired cookies. Bake at 350 for 9-11 minutes. Your cookies should be slightly browned at the edges, but will have a very soft bite - so sweet and delicious! Allow cookies to cool on a rack and prepare your buttercream or royal icing.

My daughters thought these lemons were snooze boring and demanded some with fun faces! And I am here to please, here is a Kawaii version of the sweet lemons.

I'll be adding a quickie video on my Instagram feed on how to add the faces - so easy and fun. How cute for a little girl's tea party?
Are you wanting to decorate those cookies with royal icing? You can find my recipe here.
Where did I get my lemon cookie cutter? You can pick your up from Bobbi on Etsy over here.
Yum

April Fool's Day Cookie
Do you celebrate April Fool's Day? I never did and then I had kids. Kids love pranks and gags and April Fool's Day! I finally gave in and now each year I search for new ways to make them laugh. Well we can be a low brow family and fart jokes always please. When I showed them my drawings for the whoopee cushion cookie, they just howled.The whoopee cushion cookies is pretty easy! Come check out the video below to see. If you have any questions, let me know!
Materials Needed
(I've also used this cutter as a turkey leg, but not a hot air ballon as of yet!)
Tipless icing bags

Looking for a royal icing recipe - come read my post here!
Do you have anything silly up your sleeve? Let me know!

Easy Candied Lemon Peel
Have you ever tried candied lemon peel? It is an incredibly refreshing and sweet candy that is easy to make in your kitchen! I'm in the process of creating a new spring roll out cookie recipe and candied lemon peel is one of the key ingredients. Lemon is a fabulous flavor to enjoy all year, but it always calls to me especially in the summer months. I think you will find a number of desserts and breakfast pastries that would be lovely paired with this candied lemon peel. It's so easy - let's get started!

- First pick the most gorgeous lemons you can at your local grocer. You will need 4-6 lemons depending upon the amount of peels you would like. Make sure the skin is free of blemishes and feels ripe.

- Next you will need to cut and juice the lemons. Be sure to reserve all the delicious juice for your next lemonade or meal. I kept mine for my lemonade buttercream that I will be sharing later this month.
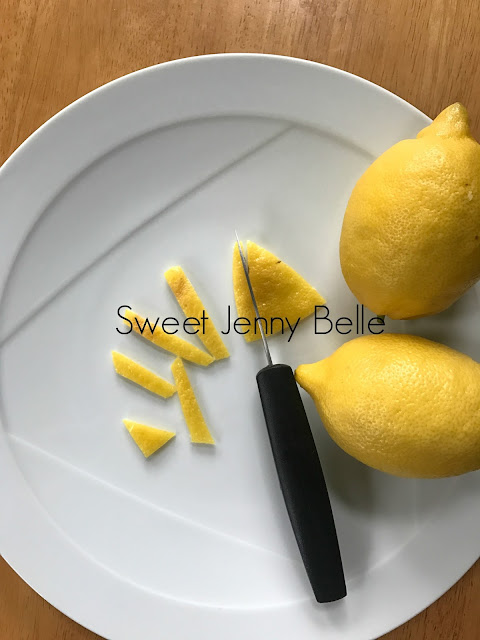
- After the lemons have been juiced, Carefully remove the flesh and thicker parts of the pith and dispose. Don't scrape the insides of the lemon too harshly - the acidity will be cooked out and you want to have a nice, meaty peel.

- Place all the lemon peel strips into a pot and fill with water until they are covered. Bring water to a rolling boil and cook for 5 minutes. Drain the water and repeat the process one more time. I only boil my lemon peels twice, but it is very important to drain and refill the water.
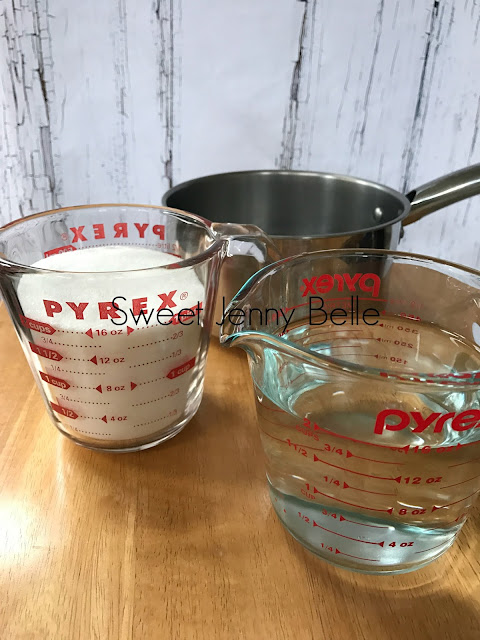
- While the lemon peels are draining, you will need to bring a simple sugar to a boil. Place 2 cups of white, granulated sugar into the pot with 2 cups of fresh water. Heat the simple sugar to a rolling boil.
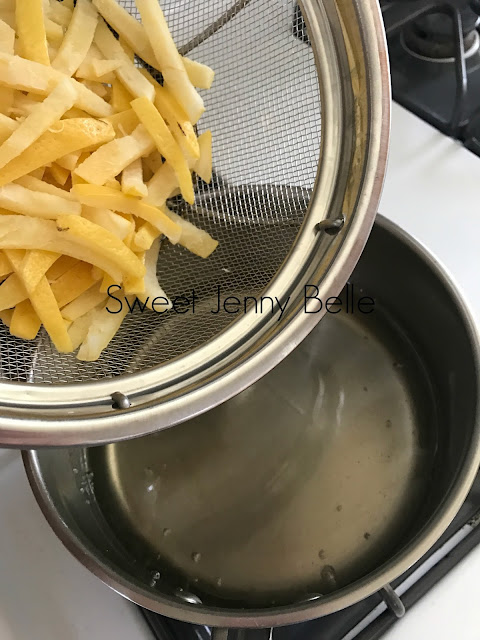
- Carefully place the drained lemon peels into the boiling simple sugar. Lower the heat and simmer for 90 minutes.

- After the peels have simmered for 90 minutes, carefully drain and reserve the lemon simple sugar. This is an amazing treat and shouldn't be tossed down the drain. You can use it to sweeten your homemade lemonade or for mixed drinks - maybe a lemon drop martini, yum!
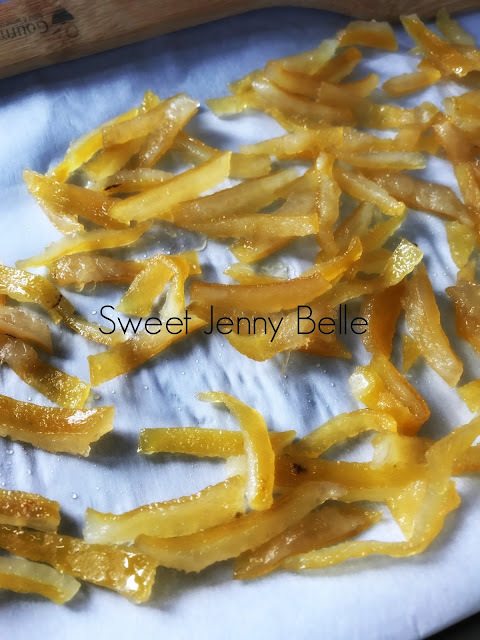
- Lay out the sticky lemon peels on a piece of parchment to dry for about an hour. You would ideally like to lay them in a single layer to drain the excess simple sugar.

- Gently coat those delicious candied lemon peels in a bowl of fresh white, granulated sugar. Make the surface of the peels are well coated or you will have a sticky mess. Lay the coated peels on a new piece of parchment and allow to dry overnight.


And my friends, that's all there is to it! Your tasty candied lemon peels should be stored in an airtight container. There are so delicious just as they are - I had to shoo my three children out of kitchen because they kept stealing them for a sweet snack. You can toss one into your lemon drop martini, dip them into white chocolate for a special treat or chop them and place on cakes!
Come back soon and I'll show you where these tasty morsels are headed.
XO,
Jenny

Moana Decorated Sugar Cookies
We had to move away from Utah this past winter. It's a long and not so happy story, but all is well now - in fact, it's better than ever. We moved to Vancouver, Washington along with my parents. During our crazy transition, the kids and I were so excited about Disney's Moana. I love the ocean and was thrilled to see a new character with a diverse and beautiful history. We loved it! The music was outstanding, the imagery was gorgeous and the theme of the story was perfect. My daughters loved Moana's courage and ability to begin a new chapter - a perfect movie.
During our move, I didn't have access to all of my fun cookie decorating tools and honestly was crazy busy unpacking and helping the kids get settled. I'm finally ready and so excited to be back. I have missed all of you and cookies! It seemed very appropriate that my first set back into the world of cookies should be the theme of Moana.

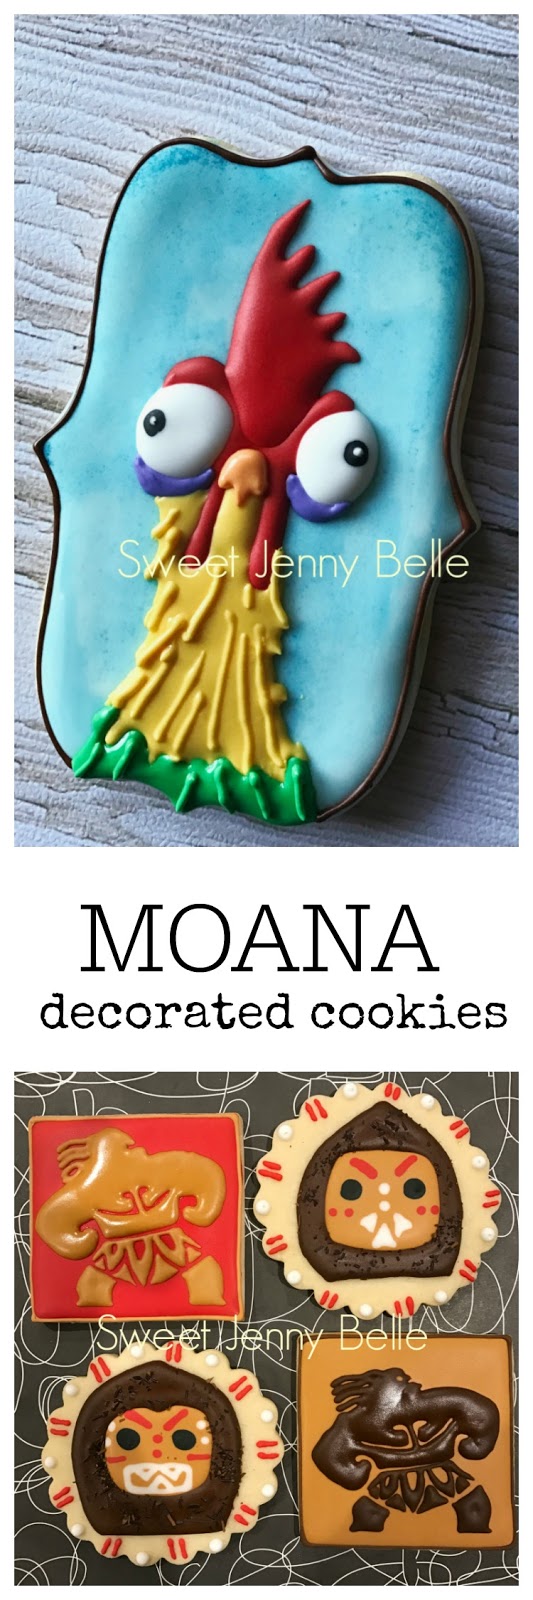
The first character I wanted to create was Hei Hei. That silly chicken makes us all laugh our heads off. I tease my kids that I look like him by the end of the day because they drive me bonkers. I did a rough sketch to get an idea of the shapes needed to draw him and added color for fun. The more times I draw a new cookie, the easier it is for me to ice him later.

And here is he is in all his goofy glory! Those icing eyes were a hoot to make. My kiddos fought over who could gobble him down.
Seriously. I look like him when 5 o'clock rolls around..

Next up, I created those angry, but cute Kakamoras and Maui's tattoos. The Kakamora's faces were created with a wet-on-wet style. The coconut shell was iced on after with some large sprinkles added to create that hairy husk appearance. Maui was actually one of the easier cookies, but he is a favorite on my Instagram account.

And this trio was my favorite of the bunch. Moana's necklace, Maui's constellation and Grandma's wise words. Sigh. This movie was just awesome.
Moana's necklace was painted with a metaliic edible silver food paint. The stone was a wet on wet design, blended together to give it a rock appearance.
Maui's constellation was flooded in a turquoise blue with edible glitter sprinkled while it was still wet. I then sprayed a dark blue along the edge with my airbrusher.

If you haven't see Moana yet, what are you waiting for? You will love it and I hope you loved looking at these cookies. Come back next week for a new cookie recipe that is perfect for Easter!
XO,
Jenny

Jedi Baby Shower Cookies
What's better than a traditional baby shower? A shower for the future Jedi, light saber wielding baby, of course! I was so excited when my best friend asked if I could create Star Wars themed baby shower cookies. Karen of Desert Chica has created an amazing themed baby shower blog post full of easy and fun ideas for you! Come check out her BB-8 Diaper Cake, Jedi baby shower banner and more!

Baby onesies for everyone! Come to the dark side or become a Jedi, we have delicious cookies for all. I have been designing a sweet Princess Leia one, too. Can't you just picture a wee Yoda? These are so easy and were fun to design.

Do you want to learn how to create a Star Wars onesie cookie? Of course you do! Let's create the baby Chewbaca together. I can just see hear his little growl now.
Do you need an awesome royal icing recipe? Click here and read up on the one I use! You will love it; let me know if you have any questions on creating it.
Materials Needed:
- Onesie cookie
- Brown icing - thick flood
- Black icing - flood
- White icing - stiff

Are you ready? Let's begin!

1. Pipe Chewbaca's black amo band across his chest.

2. Pipe two rows of white bullets on the amo band; you can wait till the band sets or place while wet.

3. Outline and squirt the thick brown icing in the top part of the onesie. It is not intended to flow down, so this is a great cookie idea if you are still getting used to icing consistency.
Using a toothpick or cookie scribe, swirl the brown icing around to mimic the look of Chewbaca's soft fur.

See? Cool, huh?!


4. Pipe 3 small snaps at the bottom of the onesie and you are done! Can you believe it? So easy and so fun!!

Like my bibs? So fun and easy! Perfect for the Star Wars lover in your life.

I hope my tutorial was easy for you. If you have questions, please let me know.
Looking for more Star Wars themed cookies?


Harry Potter Cookie Tutorial and Giveaway
When my dear friend Marissa of Rae Gun Ramblings asked if I wanted to contribute to her annual Happy Harry Potter blog party, well there was no question about it. Days full of tutorials and giveaways dedicated to one of my favorite book and movie series? Yes, please!

I think Hedwig maybe my favorite cookie and the pictures do him such little justice. His little owl wings are full sparkly sugar. And well the quote cookies can't help but break your heart a bit. Why does a good series have to end?
Do you want an easy and fun Harry Potter cookie decorating tutorial? I know you do! Come on and let's have some fun. The Ron and Hermoine cookies are quite easy too - just a few changes and no special cookie cutters!

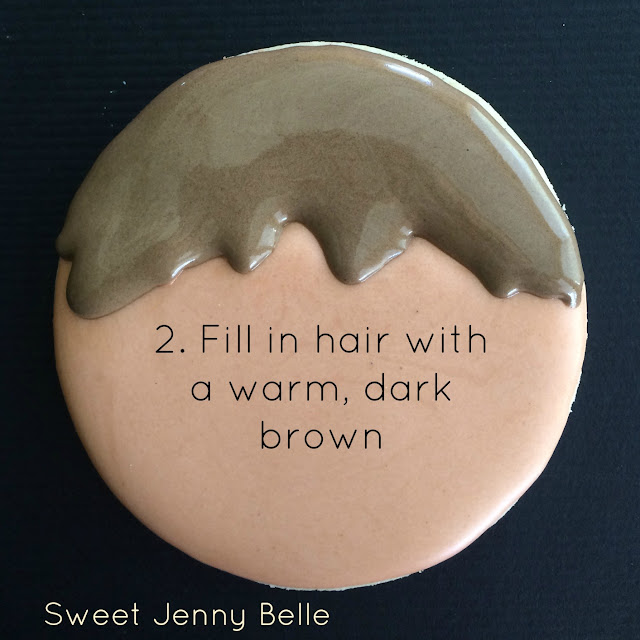

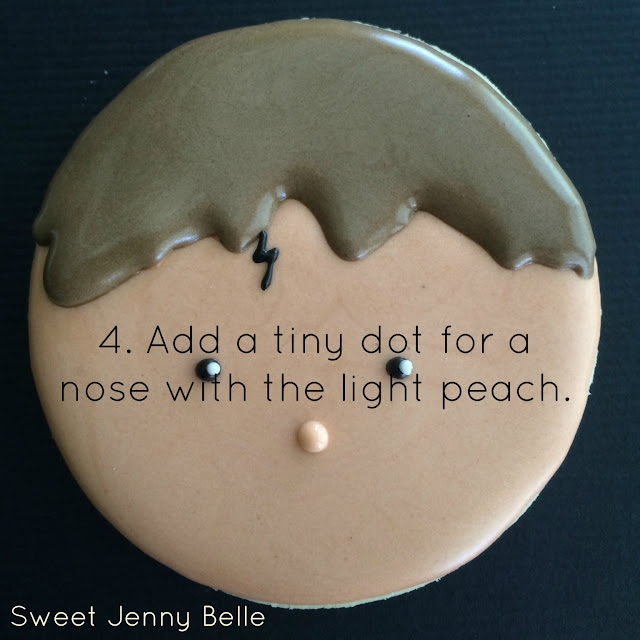


I have to say this maybe my favorite cookie set. Wait, I think I always say that. But how sweet is that little train to Hogwart's? Wouldn't it be perfect for the wee Harry Potter lover in your life?

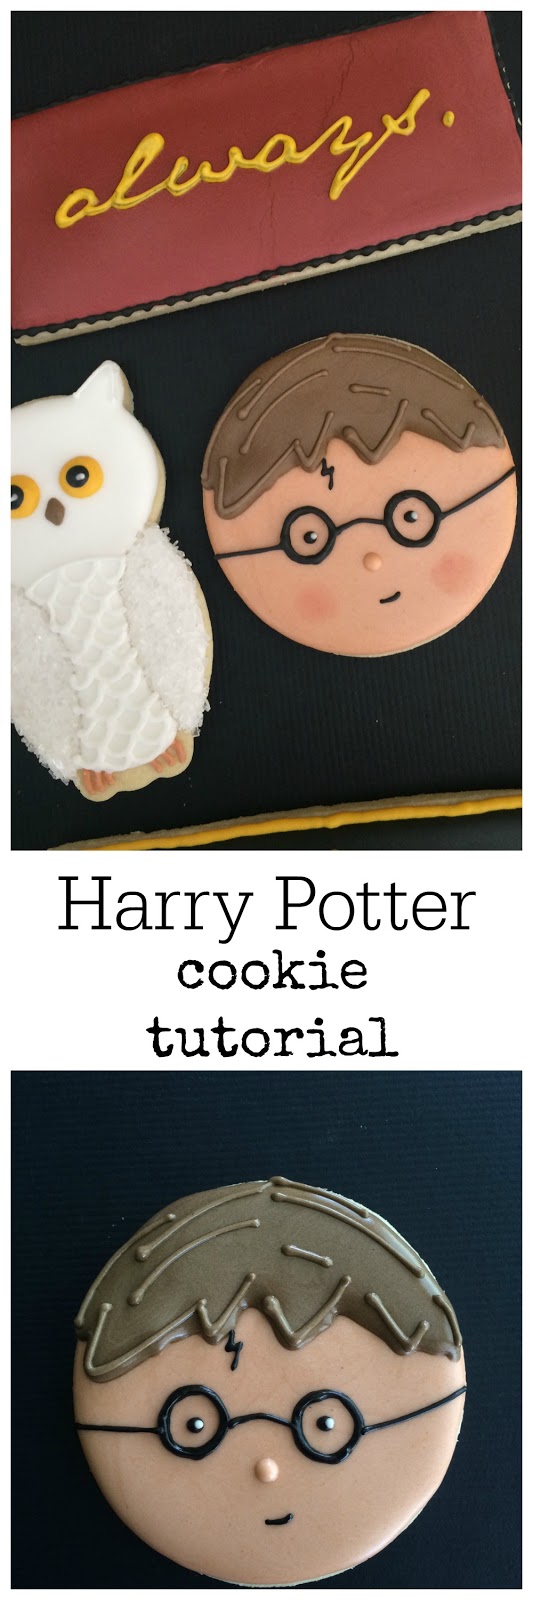
Would you like to win this cookie set from me? A dozen Harry Potter cookies shipped to you as the bakery schedule allows (if you win, this means contact me soon because my weeks book up quick!)
Do you want an easy and fun Harry Potter cookie decorating tutorial? I know you do! Come on and let's have some fun. The Ron and Hermoine cookies are quite easy too - just a few changes and no special cookie cutters!
Materials Needed
- round cookie
- light peachy flesh icing - flood consistency
- warm brown icing - flood consistency
- black icing - medium piping consistency
- white icing - medium piping consistency
- pink petal dust (if you want to add rosy cheeks)
Instructions


I have to say this maybe my favorite cookie set. Wait, I think I always say that. But how sweet is that little train to Hogwart's? Wouldn't it be perfect for the wee Harry Potter lover in your life?

Would you like to win this cookie set from me? A dozen Harry Potter cookies shipped to you as the bakery schedule allows (if you win, this means contact me soon because my weeks book up quick!)
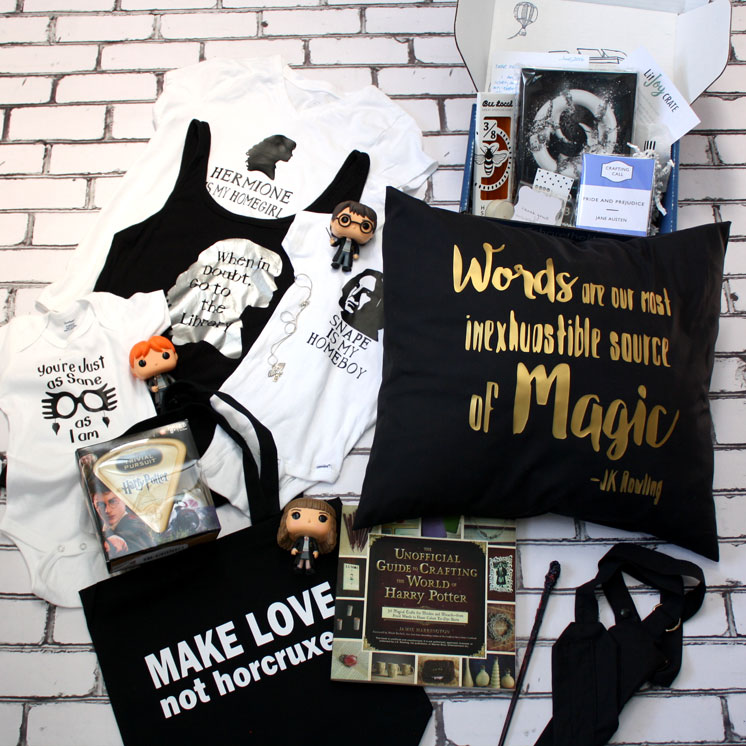
Prize Pack #2
See more about each prize and sponsor at this giveaway post and be sure to enter the other equally awesome prize pack while you're there! Winner must have a US address or be willing to pay for international shipping.
- Black Wand Holster and Magic Wand (toddler, child, and adult sizes available)
- Character Shirt (Choice of Snape, Hermione, or Luna)
- Make Love Book Bag
- Words are Magic Quote Pillow
- The Unofficial Guide to Crafting the World of Harry Potter
- Personalized Hogwarts Acceptance Letter
- World of Harry Potter Trivial Pursuit
- One Dozen Harry Potter Cookies
- Hedwig Owl Post Necklace
- Lit Joy Crate June Box
- Harry Potter Character Funko of Choice (restrictions apply)
- 10$ Worth of Harry Potter Art Prints
- Classic Maillot Swimsuit SEWING PATTERN
a Rafflecopter giveaway

Mexican Hot Chocolate Sugar Cookies
Did you know today is Frida Kahlo's birthday? She is my favorite artist for so many reasons. I think she resonates with many modern women because of her efforts to create through personal pain and strife, to stay true to her authentic voice and in that journey she broke molds of what defines beauty and art.
To celebrate Frida's birthday, I wanted to share a cookie recipe I created a few weeks ago - Mexican hot chocolate. The cookie is rich and chocolatey, when you swallow there is a slight heat that tickles your throat.

The dark chocolate flavor comes from the inclusion of black cocoa. You need to cut the black cocoa with the traditional dutch cocoa to give it the full, deep flavor. Your cookies will be dark and breath taking.

This recipes create a wonderful roll out dough that is perfect for your cookie cutters. It needs minimal chilling time and I had close to zero spread. If the chipotle spice is not of interest to you, simply leave it out and you will still have a delicious chocolate cookie!
Mexican Hot Chocolate Roll Out Cookies
Ingredients
- 1 1/2 cup granulated white sugar
- 1 cup salted butter, softened
- 2 large eggs
- 1 tsp almond extract
- 1 tsp vanilla extract
- 3 cups flour
- 1/2 tsp baking powder
- 1/2 tsp cinnamon
- 1/2 chipotle powder
- 1/3 cup black cocoa
- 1/3 cup dutch cocoa
Directions
- Cream butter and sugar together in a standard mixer for about 2 minutes.
- Add eggs, almond extract and vanilla; blend just till incorporated.
- In a separate bowl combine flour, baking powder, cinnamon, chipotle, and both cocoas. Gently add to the dough and mix until well blended.
- Chill dough for one hour in the refrigerator. Roll out dough 1/4"-3/8" thick. Cut desired shapes and bake at 350 for 9-11 minutes.

Let me know if you try them and if you have any suggestions!
Are you looking for my royal icing recipe? Click here!
Subscribe to:
Posts (Atom)

